
This post covers how to log into an SSH server with PuTTY using an RSA or DSA private keyfile. Some SSH servers require the use of these RSA and DSA key files for greater security when logging in, because additional authenication is required in the form of the keys. PuTTY cannot use these keys natively and must convert them using the PuTTYGen application. This application can be downloaded from www.chiark.greenend.org.uk/~sgtatham/putty/download.html.
Converting the RSA or DSA key with PuTTY
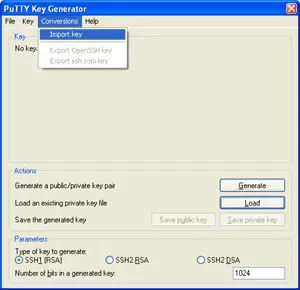
Run the puttygen.exe application by double-clicking the file you downloaded (it does not need to be installed) and select “Import Key” from the “Conversions” menu as shown in the example screenshot below. This will open a standard Windows open dialog; locate the RSA or DSA private key file and click the “Open” button. These files are usually named something like id_rsa and id_dsa.
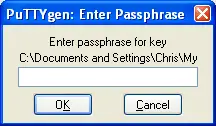
If the private key file is protected by a passphrase (highly recommended) then you will be prompted for this before the key is loaded, as shown in this next screenshot.
The private key file is now loaded into PuttyGen as shown in the screenshot below. The public key displayed in the “Key” box at the top of the screen can be added to the appropriate configuration file on the SSH server if required (ie if it has not already been done), or sent to your system administrator to add to the file. Note that although it is safe to email the public key generated here you should never email a private key file.
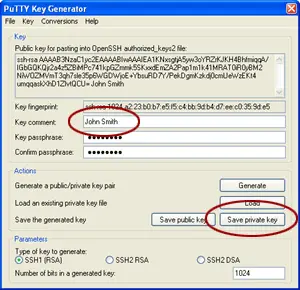
Note the “Key Comment” by default will be something like “imported-openssh-key”. You should change this to something a little more meaningful, such as your name. To save the private key click the “Save Private Key” button and then choose a place to save it using the Windows save dialog. The saved private key will be named with a .ppk extension.
Connecting to an SSH server with the private key file
Now that the key has been generated we can run PuTTY to connect to the SSH server. The basics of how to configure PuTTY are covered in the first page of this article.
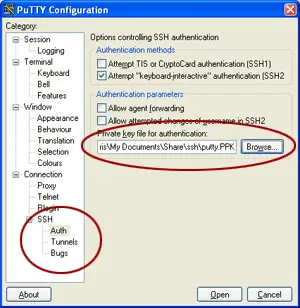
Select the “SSH -> Auth” section in the left navigation of the PuTTY configuration page as shown in the left circled region in the screenshot below. Then browse for the file you created above in the right circled region. Then make all the other configuration settings as appropriate for the SSH server and detailed in the first page of the article.
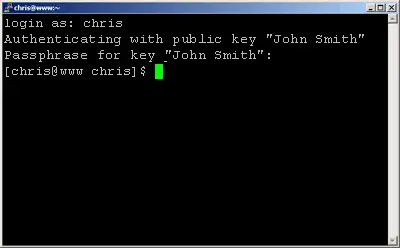
When you are ready to connect click the “Open” button on the main configuration page of PuTTY (click the “Session” option in the left navigation to get back there). When you log in you will be asked for your username as usual when logging in with PuTTY but instead of asking for a password you will be prompted instead for your passphrase as shown in the screenshot below. Note that it prompts for the passphrase for “John Smith” in this example; this is the name that is set when generating the key in the steps detailed above.
Key is of wrong type (PuTTY SSH2 private key) Error
If you get an error message like so when you try to log in:
Trying public key authentication.

Key is of wrong type (PuTTY SSH2 private key)
then you are attempting to connect to an SSH1 server with an SSH2 generated key. Go to the Connection/SSH options page and make sure the “Preferred SSH protocol version” option is set to either “2” or “2 only”.